En este post, os voy a presentar mi "reciclada" interpretación, del corsé rojo que Mary Poppins llevaba en la escena del cuadro. Confeccionada con retales de cuero, en color rojo y rosa, no sólo es un complemento más del traje, sino que le añade un plus de elegancia al conjunto.
Welcome back! In this post, I will present my "recycled" interpretation, the red corset that Mary Poppins wears at the scene of the picture. It´s been made from scraps of leather in red and pink, is not just another complement the suit, as it adds a plus of elegance to the whole.
Estos son los materiales que he reciclado esta vez para realizar este corsé:
- retales de cuero rojo y rosa pálido
- goma EVA en color negro para dar rigidez al conjunto y, de color rojo para el remate final
- hilos al tono
- pistola de silicona caliente
- cierre de velcro
- scraps of red and pale pink leather
- EVA foam black colour to give rigidity to the assembly and red for the final shot
- toned threads
- hot glue gun
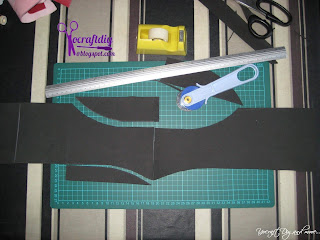
Lo primero es tener la forma del corsé: sobre
un rectángulo de goma EVA, hacemos los cortes que veis.
Además de servir de soporte, nos sirve de guía cuando estamos cosiendo los retales.
The first thing will be to get the shape of the corset: on a rectangular piece of EVA foam, just do the cuts you see in the picture. Besides serving as a support, will guide us when we are sewing the scraps.
 Disponemos los retales para coser a máquina, intercalando los trozos más estrechos de piel color rosa, entre los retales de color rojo. Haceros notar que, la disposición de los retales se rige por una pieza central rosa, y dos piezas rojas y otras dos de color rosa, hacia la derecha y otras tantas, a la izquierda.

When we have the scraps to sew on the sewing machine, insert narrower pieces of skin pink, among scraps of red. Note that the arrangement of the scraps is governed by a rose centrepiece, and two red pieces and two ones in pink, clockwise and many others, to the left. The rest, until the end of the corset, leather scraps are red, until the whole sash.

Then we help the iron, Yesss... we can use the iron without steam !!, and a piece of a slightly damp cloth, proceed to mark the folds and corset sewn on the EVA.
This step is very useful because it facilitates subsequent bonding.
Como punto final a nuestro trabajo, y para un acabado más esmerado, pegamos con silicona caliente una tira de goma EVA de color rojo, que ocultara todos los dobleces que hemos hecho.
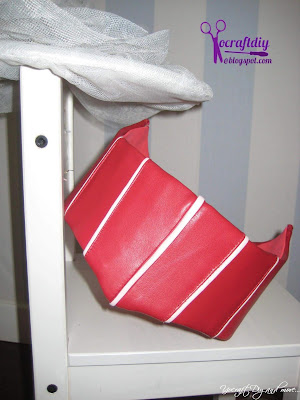
Por último, ponemos un trozo de velcro en el final del corsé para el cierre y...ya está!
un rectángulo de goma EVA, hacemos los cortes que veis.
Además de servir de soporte, nos sirve de guía cuando estamos cosiendo los retales.
The first thing will be to get the shape of the corset: on a rectangular piece of EVA foam, just do the cuts you see in the picture. Besides serving as a support, will guide us when we are sewing the scraps.
 Disponemos los retales para coser a máquina, intercalando los trozos más estrechos de piel color rosa, entre los retales de color rojo. Haceros notar que, la disposición de los retales se rige por una pieza central rosa, y dos piezas rojas y otras dos de color rosa, hacia la derecha y otras tantas, a la izquierda.
El resto, hasta el final del corsé, serán retales de piel color rojo, hasta completar todo el fajín.

When we have the scraps to sew on the sewing machine, insert narrower pieces of skin pink, among scraps of red. Note that the arrangement of the scraps is governed by a rose centrepiece, and two red pieces and two ones in pink, clockwise and many others, to the left. The rest, until the end of the corset, leather scraps are red, until the whole sash.
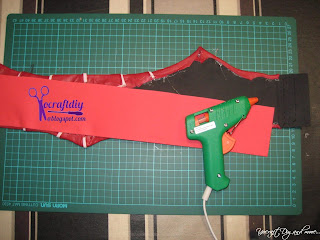
Después nos ayudamos de la plancha, Siii... podemos usar la plancha sin vapor!, y de un trozo de tela ligeramente humedecido, procedemos a marcar los pliegues del corsé ya cosido, sobre la goma EVA.
Este paso es muy útil, ya que nos facilita el pegado posterior.
Ah, y recordad!...no es necesario apretar demasiado la plancha, la temperatura debe ser moderada y...que la piel húmeda...DESTIÑE!!!

Then we help the iron, Yesss... we can use the iron without steam !!, and a piece of a slightly damp cloth, proceed to mark the folds and corset sewn on the EVA.
This step is very useful because it facilitates subsequent bonding.
Oh, and remember! ... No need to tighten the iron the temperature should be moderate and ... that ... wet skin ... lose colour !!!
Ahora ya, podemos usar nuestra pequeña pistola de silicona caliente. Vamos poniendo gotitas de pegamento en los bordes de la espuma y, presionamos suavemente la piel sobre ella.
Now, we can use our little hot glue gun. Let us put drops of glue on the edges of the foam and gently pressed the skin over it.Como punto final a nuestro trabajo, y para un acabado más esmerado, pegamos con silicona caliente una tira de goma EVA de color rojo, que ocultara todos los dobleces que hemos hecho.
As a final point of our work, and for a more accurate finish, stick with hot glue a strip of red foam EVA and hide the folds we've done.
Finally, we put a piece of velcro at the end of corset closure and ... that's it!
Espero que os guste el resultado y, como siempre os sirva de inspiración.
Nos vemos pronto, en una nueva entrega del disfraz!
Así que...seguid reciclando y disfrutando!!!
Yolanda.
I hope you like the result and it will inspire you
See you soon on a new release of disguise!
So ... keep recycling and enjoying !!!


